SocketIO
Socket.io is a common library in the industry, which can be used for real-time, two-way and event-based communication between browsers and servers.
Midway provides support and encapsulation for Socket.io, which can simply create a Socket.io service. This article demonstrates how to provide Socket.io service under Midway system.
Midway uses the latest Socket.io (v4.0.0) for development.
Related information:
Provide services
| Description | |
|---|---|
| Can be used for standard projects | ✅ |
| Can be used for Serverless | ❌ |
| Can be used for integration | ✅ |
| Contains independent main framework | ✅ |
| Contains independent logs | ❌ |
Install dependency
Install Socket.io dependencies in existing projects.
$ npm i @midwayjs/socketio@3 --save
## optional dependencies
$ npm i @types/socket.io-client socket.io-client --save-dev
Or reinstall the following dependencies in package.json.
{
  "dependencies": {
    "@midwayjs/socket.io": "^3.0.0",
    // Client optional
    "socket.io-client": "^4.4.1 ",
    // ...
  },
  "devDependencies": {
    // Client optional
    "@types/socket.io-client": "^1.4.36 ",
    // ...
  }
}
Open the component
@midwayjs/socket.io can be used as an independent main framework.
import { Configuration } from '@midwayjs/core';
import * as socketio from '@midwayjs/socketio';

@Configuration({
  imports: [socketio]
  // ...
})
export class MainConfiguration {
  async onReady() {
        // ...
  }
}
It can also be attached to other main frameworks, such as @midwayjs/koa.
import { Configuration } from '@midwayjs/core';
import * as koa from '@midwayjs/koa';
import * as socketio from '@midwayjs/socketio';

@Configuration({
  imports: [koa, socketio]
  // ...
})
export class MainConfiguration {
  async onReady() {
        // ...
  }
}
Directory structure
The following is the basic directory structure of the Socket.io project. Similar to traditional applications, we have created a socket directory to store service codes for Soscket.io services.
.
├── package.json
├── src
│   ├── configuration.ts          ## entry configuration file
│   ├── interface.ts
│   └── socket                      ## socket.io service file
│       └── hello.controller.ts
├── test
├── bootstrap.js                  ## service startup Portal
└── tsconfig.json
Socket.io works
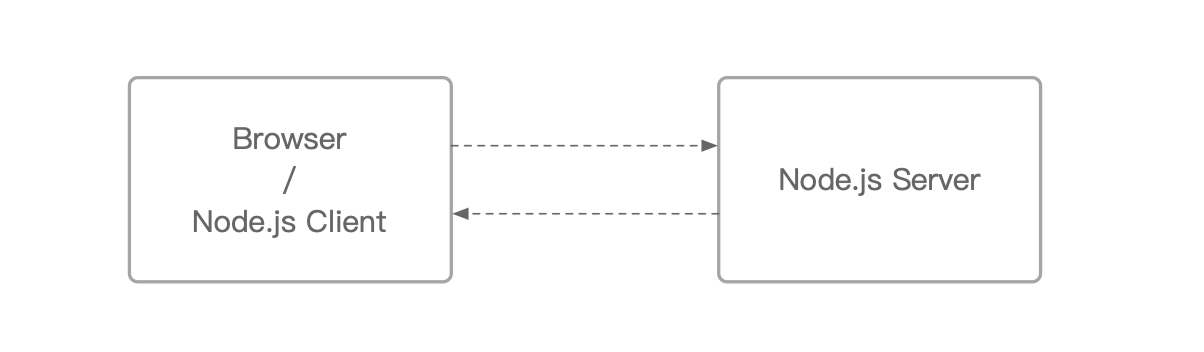
The two-way channel between the Socket.io server and the Socket.io client (browser, Node.js or another programming language) is established through a WebSocket connection. When it is not available, HTTP long polling will be used as a backup means.
The Socket.io code is built based on the Engine.io library and belongs to the upper-level implementation of Engine.io. Engine.io is responsible for the connection between the entire server and the client, including connection check, transmission method, etc. Socket.io is responsible for the reconnection, packet buffering, broadcasting and other features of the upper layer.
Socket.io(Engine.io) implements two Transports (transmission mode).
The first is HTTP long polling. HTTP Get requests are used for long-running (long connection) and Post requests are used for short-running (short connection).

The second is the WebSocket protocol, which is directly based on WebSocket Connection implementation. It provides a two-way and low-latency communication channel between the server and the client.
By default, Socket.io will first use HTTP long polling to connect and send a data similar to the following structure.
{
  "sid": "FSDjX-WRwSA4zTZMALqx", // session id of connection
  "upgrades": ["WebSocket"], // Upgradeable protocol
  "pingInterval": 2500, //heartbeat interval
  "pingTimeout": 20000 // heartbeat timeout
}
When the current service meets the requirements of upgrading to the WebSocket protocol, it will automatically upgrade to the WebSocket protocol, as shown in the following figure.

- 1, the first handshake, transmission sid and other structures
- Send data using HTTP long polling
- Use HTTP long polling to return data
- Upgrade the protocol and use the WebSocket protocol to send data
- When the protocol is upgraded, close the previous long polling
After that, normal WebSocket communication began.
Socket service
Midway defines the Socket service through the @WSController decorator.
@WSController('/')
export class HelloController {
  // ...
}
The input of @WSController refers to the Namespace (non-path) of each Socket. If no Namespace is provided, each Socket.io will automatically create a/Namespace and put all client connections into it.
The namespace here supports strings and regularization.
When the Namespace has a client connection, a connection event will be triggered. We can use the @OnWSConnection() decorator in the code to decorate a method. When each client connects to the Namespace for the first time, the method will be automatically called.
import { WSController, OnWSConnection, Inject } from '@midwayjs/core';
import { Context } from '@midwayjs/socketio';

@WSController('/')
export class HelloSocketController {

  @Inject()
  ctx: Context;

  @OnWSConnection()
  async onConnectionMethod() {
    console.log('on client connect', this.ctx.id);
  }
}
The ctx here is equivalent to the socket instance.
Messages and responses
Socket.io obtains data by monitoring events. Midway provides a @OnWSMessage() decorator to format the received event. Every time the client sends an event, the modified method will be executed.
import { WSController, Provide, OnWSMessage, Inject } from '@midwayjs/core';
import { Context } from '@midwayjs/socketio';

@WSController('/')
export class HelloSocketController {

  @Inject()
  ctx: Context;

  @OnWSMessage('myEvent')
  async gotMessage(data) {
    console.log('on data got', this.ctx.id, data);
  }
}
Note that since Socket.io can pass multiple data in one event, the parameters here can be multiple.
  @OnWSMessage('myEvent')
  async gotMessage(data1, data2, data3) {
    // ...
  }
After the data is obtained, the data is processed through business logic, and then the result is returned to the client. When returned, we also send it to the client through another event.
The @WSEmit decorator returns the return value of the method to the client.
import { WSController, OnWSConnection, Inject } from '@midwayjs/core';
import { Context } from '@midwayjs/socketio';

@WSController('/')
export class HelloSocketController {

  @Inject()
  ctx: Context;

  @OnWSMessage('myEvent')
  @WSEmit('myEventResult')
  async gotMessage() {
    return 'hello world'; // The hello world string is returned to the client here.
  }
}
The above code, our method returns the value Hello World, which will be automatically sent to the myEventResult event monitored by the client.
Socket Middleware
The middleware in Socket is written similarly to the Web middleware, but the timing of loading is slightly different.
Since Socket has two stages of connecting and receiving messages, middleware is divided into several categories.
- The global Connection middleware will take effect on connections under all namespaces
- The global Message middleware will take effect for all message under the namespace.
- Controller middleware will take effect on connection and message under a single namespace.
- Connection middleware generates messages for connection under a single namespace.
- Message middleware will take effect on message under a single namespace.
Middleware writing
Note that the middleware must return the result via return.
// src/middleware/socket.middleware.ts
import { Middleware } from '@midwayjs/core';
import { Context, NextFunction } from '@midwayjs/socketio';

@Middleware()
export class SocketMiddleware {
  resolve() {
    return async (ctx: Context, next: NextFunction) => {
      // ...
      return await next();
    }
  }
}
Global middleware
Similar to web middleware, use the socket.io app instance to register middleware.
import * as socketio from '@midwayjs/socketio';

@Configuration({
  imports: [
    socketio
  ],
  // ...
})
export class MainConfiguration {

  @App('socketIO')
  app: Application;

  async onReady() {
    // Can register global connection middleware
    this.app.useConnectionMiddleware(SocketMiddleware);
    // You can also register global Message middleware
    this.app.useMiddleware(SocketMiddleware);
  }
}
Middleware in Namespace
Through the decorator, the middleware of different stages is registered.
For example, Namespace-level middleware will take effect on connection and message under a single namespace.
// ...

// Namespace-level middleware
@WSController('/api', { middleware: [SocketMiddleware]})
export class APIController {
}
Connection middleware, which takes effect when connected.
// ...

@WSController('/api')
export class APIController {

  // Middleware when Connection is triggered
  @OnWSConnection({
    middleware: [SocketMiddleware]
  })
  init() {
    // ...
  }
}
Message middleware that takes effect when a specific message is received.
// ...

@WSController('/api')
export class APIController {

  // Middleware when Message is triggered
  @OnWSMessage('my', {
    middleware: [SocketMiddleware]
  })
  @WSEmit('ok')
  async gotMyMessage() {
    // ...
  }
}
Local test
Because the socket.io framework can be started independently (attached to the default http service or with other midway frameworks).
When starting as a standalone framework, you need to specify a port.
// src/config/config.default
export default {
  // ...
  socketIO: {
    port: 3000
  },
}
When starting as a sub-framework (for example, and http, because http does not specify a port during a single test (automatically generated using supertest), it cannot be tested well, and only one port can be explicitly specified in the test environment.
// src/config/config.unittest
export default {
  // ...
  koa: {
    port: null,
  },
  socketIO
    port: 3000
  },
}
- The port here is only the port that the WebSocket service starts during testing.
- The port in koa is null, which means that the http service will not be started without configuring the port in the test environment.
Like other Midway testing methods, we use createApp to start the project.
import { createApp, close } from '@midwayjs/mock'
// The Framework definition used here is subject to the main framework.
import { Framework } from '@midwayjs/koa';

describe('/test/index.test.ts', () => {
  it('should create app and test socket.io', async () => {
    const app = await createApp<Framework>();

    //...

    await close(app);
  });

});
You can use socket.io-client to test. You can also use a test client that is encapsulated by the socket.io-client module provided by Midway.
If our server processing logic is as follows (returns the result of adding the data passed by the client):
@OnWSMessage('myEvent')
@WSEmit('myEventResult')
async gotMessage(data1, data2, data3) {
  return {
    name: 'harry',
    result: data1 + data2 + data3
  };
}
The test code is as follows:
import { createApp, close } from '@midwayjs/mock'
import { Framework } from '@midwayjs/koa';
import { createSocketIOClient } from '@midwayjs/mock';
import { once } from 'events';

describe('/test/index.test.ts', () => {
  it('should test create socket app', async () => {

    // Create a service
    const app = await createApp<Framework>();

    // Create a corresponding client
    const client = await createSocketIOClient({
      port: 3000
    });

    // Return the result
    const data = await new Promise(resolve => {
      client.on('myEventResult', resolve);
      // Send event
      client.send('myEvent', 1, 2, 3);
    });

    // Judgment result
    expect(data).toEqual({
      name: 'harry',
      result: 6
    });

    // Close the client
    await client.close();
        // Close the server
    await close(app);
  });

});
If you have multiple clients, you can use the once method of the events module that comes with the node to optimize the code.
import { createApp, close } from '@midwayjs/mock'
import { Framework } from '@midwayjs/koa';
import { createSocketIOClient } from '@midwayjs/mock';
import { once } from 'events';

describe('/test/index.test.ts', () => {

  it('should test create socket app', async () => {

    // Create a service
    const app = await createApp<Framework>();

    // create a client
    const client = await createSocketIOClient({
      port: 3000
    });

    // Monitor with promise writing of events
    const gotEvent = once(client, 'myEventResult');
    // Send event
    client.send('myEvent', 1, 2, 3);
    // Waiting for return
    const [data] = await gotEvent;
    // Judgment result
    expect(data).toEqual({
      name: 'harry',
      result: 6
    });

    // Close the client
    await client.close();
        // Close the server
    await close(app);
  });

}
The two writing methods have the same effect, just write as you understand.
Message waiting for receipt (ack)
Socket.io supports a way of writing directly returning messages. When the client delivers a message, if the last parameter is a function(callback), the server can get the callback and return the data directly to the client without creating a new message.
Our service code does not need to be changed. @midwayjs/socketio will judge the last parameter and automatically return it to the client.
For example, server code:
@OnWSMessage('myEvent')
@WSEmit('myEventResult')
async gotMessage(data1, data2, data3) {
  return {
    name: 'harry',
    result: data1 + data2 + data3
  };
}
Client test code:
import { createApp, close } from '@midwayjs/mock'
import { Framework } from '@midwayjs/koa';
import { createSocketIOClient } from '@midwayjs/mock';
import { once } from 'events';

describe('/test/index.test.ts', () => {

  it('should test create socket app', async () => {

    // Create a service
    const app = await createApp<Framework>();

    // Create a corresponding client
    const client = await createSocketIOClient({
      port: 3000
    });

    // Send event, which is written in await
    const data = await client.sendWithAck('myEvent', 1, 2, 3);

    // Judgment result
    expect(data).toEqual({
      name: 'harry',
      result: 6
    });

    // Close the client
    await client.close();
        // Close the server
    await close(app);
  });

});
Common messages and broadcasts
The following code example:
import { Context, Application } from '@midwayjs/socketio';
import { WSController, OnWSMessage, WSEmit, App, Inject } from '@midwayjs/core';

@WSController('/')
export class HelloSocketController {

  @Inject()
  ctx: Context;

  @App('socketIO')
  app: Application;

  @OnWSMessage('myEvent')
  @WSEmit('myEventResult')
  async gotMessage() {
    // TODO
  }
}
Send to the client (or return directly in the form of a decorator).
this.ctx.emit("hello", "can you hear me?", 1, 2, "abc");
Sent to all clients except the sender.
this.ctx.broadcast.emit("broadcast", "hello friends! ");
Send it to all clients in the game room except the sender.
this.ctx.to("game").emit("nice game", "let's play a game");
It is sent to all clients in game1 and game2 rooms except the sender.
this.ctx.to("game1").to("game2").emit("nice game", "let's play a game (too)");
It is sent to all clients in the game room, including the sender.
this.app.in("game").emit("big-announcement", "the game will start soon");
Broadcast to clients myNamespace namespaces, including senders.
// Send from app
this.app.of("myNamespace").emit("bigger-announcement", "the tournament will start soon");
// Send from ctx
this.ctx.nsp.emit("bigger-announcement", "the tournament will start soon");
Send to specific namespace and room, including sender.
// Send from app
this.app.of("myNamespace").to("room").emit("event", "message");
// Send from ctx
this.ctx.nsp.emit("bigger-announcement", "the tournament will start soon");
Send to all clients connected to the current node (when there are multiple nodes, it is multi-process)
this.app.local.emit("hi", "my lovely babies");
Application(io object)
The code created by the traditional Socket.io server is as follows:
const io = require("socket.io")(3000);

io.on("connection", socket => {
  // ...
});
in the @midwayjs/socketio framework, the Application instance is the io instance with the same type and capability. The app instance injected by the @App decorator is an io object.
We can do some global things through this object.
For example, get all socket instances.
// Returns all socket instances
const sockets = await app.fetchSockets();

// Returns all socket instances in room1.
const sockets = await app.in("room1").fetchSockets();

// Returns an instance of a specific socketId
const sockets = await app.in(theSocketId).fetchSockets();
Under multiple frameworks, the main framework is generally a Web framework. We can obtain the app of Socket.io by specifying the key.
import { Application as SocketApplication } from '@midwayjs/socketio';
import { Controller, App } from '@midwayjs/core';

@Controller()
export class UserController {

  @App('socketIO')
  socketApp: SocketApplication;
}
In this way, we can call the existing socket connection through the app object of @midwayjs/socketio (equivalent to io).
For example, an HTTP request is called to broadcast to all clients under a specific namespace:
import { Application as SocketApplication } from '@midwayjs/socketio';
import { Provide, Controller, App, Get } from '@midwayjs/core';

@Controller()
export class UserController {

  @App('socketIO')
  socketApp: SocketApplication;

  @Get()
  async invoke() {
    // Broadcast the connection under/
    this.socketApp.of('/').emit('hi', 'everyone');
  }
}
For more io API, please refer to the Socket.io Server instance documentation.
Socket deployment
Socket service port
The configuration sample of @midwayjs/socketio is as follows:
// src/config/config.default
export default {
  // ...
  socketIO: {
    port: 7001
  },
}
HTTP ports can be reused when @midwayjs/socketio and other @midwayjs/Web, @midwayjs/Koa, @midwayjs/express are enabled at the same time.
// src/config/config.default
export default {
  // ...
  koa: {
    port: 7001
  },
  socketIO: {
    // No configuration here
  },
}
Nginx configuration
Generally speaking, our Node.js service will have similar reverse proxy services such as Nginx before. Here, take the configuration of Nginx as an example.
http {
  server {
    listen 80;
    server_name example.com;

    location / {
      proxy_set_header X-Forwarded-For $proxy_add_x_forwarded_for;
      proxy_set_header Host $host;

      proxy_pass http://localhost:7001;

      proxy_http_version 1.1;
      proxy_set_header Upgrade $http_upgrade;
      proxy_set_header Connection "upgrade";
    }
  }
}
Configuration
Available configuration
| Property | Type | Description |
|---|---|---|
| port | number | Optionally, if the port is passed, socket.io will create an HTTP service for the port and attach the socket service to it. If you want to work with other midway web frameworks, do not pass this parameter. |
| path | string | optional, server path |
| adapter | object | Adapters for distributed processing, such as configurable redis-adapter |
| connectTimeout | number | Client timeout, in MS, default value 45000 |
For more information about startup options, see Socket.io documentation.
Adapter
Adapter is an adaptation layer for Socket.io to communicate with multiple machines and processes during distributed deployment. Currently, there are several adapters officially provided by socket.io:
- cluster-adapter is used to adapt between single machine and multi-process
- The redis-adapter is used to adapt between multiple machines and processes.
In distributed scenarios, we generally use redis-adapater to implement functions.
Configure redis adapter
@midwayjs/socketio provides an adapter (adapter) entry configuration. You only need to initialize the adapter instance and pass it in.
Socket.io has updated the original adapter package name. The current package name is @socket.io/redis-adapter (originally called socket.io-redis ). For more information about migration, see the official documentation.
The installation is as follows:
$ npm i @socket.io/redis-adapter --save
For more information, see Official documentation:
// src/config/config.default
import { createAdapter } from '@socket.io/redis-adapter';
import Redis from 'ioredis';

// github document creates a redis instance

const pubClient = new redis (/* redis configuration */);
const subClient = pubClient.duplicate();

export default {
  // ...
  socketIO: {
    adapter: createAdapter(pubClient, subClient)
  },
}
By running Socket.io using the @socket.io/redis-adapter adapter, you can run multiple Socket.io instances in different processes or servers, all of which can broadcast and send events to each other.
In addition, there are some special APIs on the Adapter, which can be viewed in documents.
Sticky session
Since Node.js often uses multi-process (cluster) mode at startup, if the same session (sid) cannot access the same process multiple times, socket.io will report an error.
There are two solutions.
Use the WebSocket protocol
The easiest way is to only enable the WebSocket protocol (disable long polling), so that the above problems can be circumvented.
You need to configure both server and client.
// Server
export default {
   //...
   socketIO: {
     //...
     transports: ['websocket'],
   },
}

// client
const socket = io("http://127.0.0.1:7001", {
   transports: ['websocket']
});
Adjust the process model
This is a relatively complicated method, but in the scenario of pm2 deployment, it is the only solution to support both sticky sessions and polling support.
The first step is to disable the ports enabled in the configuration, such as:
// src/config/config.default
export default {
   koa: {
     // port: 7001,
   },
   socketIO: {
     //...
   },
};
If development needs, you can add the port in config.local, or directly add the port in the scripts of package.json.
"scripts": {
   "dev": "cross-env NODE_ENV=local midway-bin dev --ts --port=7001",
},
In the second step, adjust the content of your bootstrap.js file to the following code.
const { Bootstrap, ClusterManager, setupStickyMaster } = require('@midwayjs/bootstrap');
const http = require('http');

// Create a process manager to handle child processes
const clusterManager = new ClusterManager({
   exec: __filename,
   count: 4,
   sticky: true, // enable sticky session support
});

if (clusterManager. isPrimary()) {
   // The main process starts an http server to monitor
   const httpServer = http. createServer();
   setupStickyMaster(httpServer);

   // start child process
   clusterManager.start().then(() => {
     // listening port
     httpServer.listen(7001);
     console.log('main process is ok');
   });

   clusterManager.onStop(async () => {
     // close http server when stopped
     await httpServer. close();
   });
} else {
   // subprocess logic
   Bootstrap
     .run()
     .then(() => {
       console.log('child is ready');
     });
}
When pm2 starts, there is no need to specify the -i parameter to start the worker, directly pm2 --name=xxx ./bootstrap.js to make it start only one process.
Common API
Get the number of connections
Const count = app.engine.clientsCount; //Get all connections
Const count = app.of('/').sockets.size; // Get the number of connections in a single namespace
Modify sid generation
const uuid = require("uuid");

app.engine.generateId = (req) => {
  return uuid.v4(); // must be unique across all Socket.IO servers
}
Frequently Asked Questions
The server/client is not connected and does not respond
- The port server is consistent with the client
export default {
  koa: {
    Port: 7001, // Port here
  }
}

// or

export default {
  socketIO: {
    Port: 7001, // Port here
  }
}
Consistent with the following ports.
// socket.io client
const socket = io('************:7001', {
  //...
});

// midway's socket.io test client
const client = await createSocketIOClient({
  port: 7001
});
- The path of the server and the path of the client must be consistent. Path refers to the part of the startup parameter.
// config.default
export default {
  socketIO: {
    Path: '/testPath' // This is the server path
  }
}
Consistent with the path below
// socket.io client
const socket = io('************:7001', {
  Path: '/testPath' // here is the path of the client
});

// Midway's Socket. io test client
const client = await createSocketIOClient({
  path: '/testPath'
});
- The namespace of the server and the namespace of the client should be consistent.
// server
@WSController('/test') // here is the namespace of the server
export class HelloController {
}

// socket.io client
const io = require("socket.io-client")
io('*****:3000/test', {}); // Here is the namespace of the client


// midway's socket.io test client
const client = await createSocketIOClient({
  namespace: '/test',
});
Configure CORS
If a cross-domain error occurs, cors information needs to be configured at startup.
// config.default
export default {
  socketIO: {
    cors: {
      origin: "http://localhost:8080 ",
      methods: ["GET", "POST"]
    }
  }
}
For specific parameters, see Socket.io Handling CORS.